


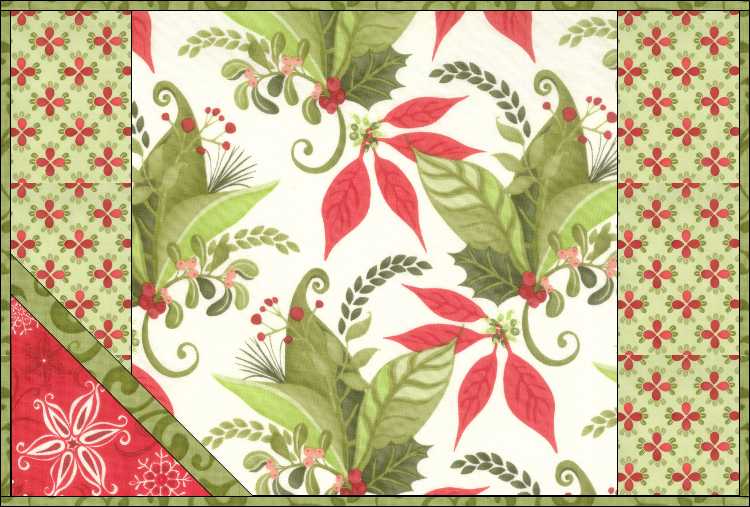
The placemat includes a pocket on one corner for a coordinating napkin.


· For a set of 4 placemats and 4 napkins, you will need 20 FQ’s (if you want different fabrics for each place setting). From those 20 FQ’s you will have sufficient remaining fabric to make additional placemats and napkins by recombining fabrics.
· 18” x 24” piece of thin batting for each placemat
· Basting Spray or safety pins
· Matching thread
Cutting List: ( for ONE placemat)
· From your FQ bundle Select which fabrics you will use for the center squares, the accent side panels, the pockets, pocket trim, and binding. Select a full FQ for the back of each placemat. Label each FQ.
· From main print FQ cut a 14” square (center of placemat)
· From accent FQ cut two 3 1/2” x 14” rectangles (side panels)
· From contrasting FQ cut a 10” square, sub
-cut once on the diagonal (pocket)
· From contrasting FQ cut one 15" x 1-1/4” strip , Press in half lengthwise, wrong sides together (trim strip on the edge of the pocket)
· From contrasting FQ cut 80” of 2-1/4” strips for binding. Join strips. Press in half lengthwise, wrong sides together.
· From two different accent fabrics, cut a 14” square (for lined napkins)
1. Stitch a 3-1/2” x 14” accent strip to either side of the center 14” square. Press toward the accent fabric.
2. Layer the placemat with batting and a FQ for backing. Spray baste or pin layers together.
3. Mark cross hatching on quilt top with washable marker. Quilt with matching thread. Use a walking foot on your machine to keep the layers from shifting.
4. Trim placemat to remove excess batting and backing and to even up the edges.
5. Pin pressed 15" x 1-1/4” trim strip to the long side of one of the pocket triangles, right side together and raw edges matching. Place second pocket triangle on top of first triangle, right sides together and pin along the long edge. The trim strip will be between the two triangles. Stitch along the long edge through all layers being careful not to stretch the bias edge of the triangles.
6. Press the two pocket triangles away from the trim strip. Press the whole unit with starch or sizing to give it some extra body. Trim the two short sides of the triangle with a large square ruler to even up the edges and make sure they are square.
7. Align the pocket triangle unit with lower left corner of the placemat. Pin in place and baste 1/8” from the raw edge.
8. Open out one end of the prepared binding strip and fold the end over to form a 45 degree angle to the long edge. Refold the binding strip in half and press. Stitch the binding to the BACK of the placemat leaving the first 4” unstitched using a 1/4” seam. Use matching thread for both the top and the back. Use a walking foot to stitch down the binding and miter the corners.
9. When you get near the starting point, pin the loose 4” of binding in place and tuck the end of the binding between the two layers of those first 4”. Trim off any excess binding. The two ends of the binding should only overlap about 2”. Pin all layers in place aligning raw edges of the binding to the raw edge of quilt. Finish stitching down the binding through all layers.
10. Press the binding away from the back. Turn placemat over and press the binding over the raw edge of the quilt FRONT. Steam the fold as you press. Miter the corners and press well.
11. Using a blind hem stitch and matching thread, stitch down the binding on the FRONT of the quilt.
12. Remove any quilting marks and press the placemat.
Now make the napkin.
· Use the two 14” squares you cut from two coordinating FQs.
· With right sides together stitch the squares together on all four sides using a quarter inch seam allowance. Leave a 5” opening to turn in the middle of one side. You can use a serger for this if you have one. Just be sure to leave the opening in the 4th side.
· Turn the napkin right sides out and carefully press the edges flat, trying not to get “foldy” puckers along the edges. If you have a Seam Roll insert it inside the napkin, position it beneath the seam and press the seam flat. You can make a seam roll by taking four FQ’s and folding them in quarters. Stack them one atop the other and tightly roll them up. Wrap a strip of cut off selvage around each end of the roll and pin the strips in place with a long pin.
· Remove the seam roll and finish pressing the edges. Make sure you push out the four corners. Fold under the 1/4” seam allowance in the opening and press, aligning the edges of the two sides of the napkin.
· With matching thread top stitch around the napkin on all four sides 1/8” from the edge. Stitch a second row of stitches, just next to first row of stitching if desired. Press the napkin, fold, and insert into the napkin pocket on the placemat.
Click Here to download the PDF pattern.
Table Toppers, Home and Kitchen
Inquiring Quilter
Duck Creek Mountain Quilting
Cooking Up Quilts
The Quilted Diary
Confessions of a Fabric Addict
Morning Glory Designs
Scrapdash
Days Filled With Joy
Small Projects
Geeky Bobbin
Sunburnt Quilts
Tamarinis
Tuning My Heart Quilts
Prairie Sewn Studios
Puppy Girl Designs
Ladybug Buzz
Dragonfly's Quilting Design Studio
Traditional and Modern Quilt Patterns
Ms P Designs USA
Quilt 2 End ALZ
Patti's Patchwork
Cotton Street Commons
Brown Bird Designs
From My Carolina Home

