Showing posts with label free pattern. Show all posts

Wednesday, July 15, 2020

Christmas in July Blog Parade - Holiday Placemat Tutorial


Welcome to the Christmas in July 15 Pattern Parade.  

Here is super simple placemat and napkin pattern to make up using Fat Quarters for a quick gift or for your own Holiday table.   

Please leave a comment to be entered in a drawing to win a Fat Quarter pack of Christmas fabrics!


The placemat includes a pocket on one corner for a coordinating napkin.
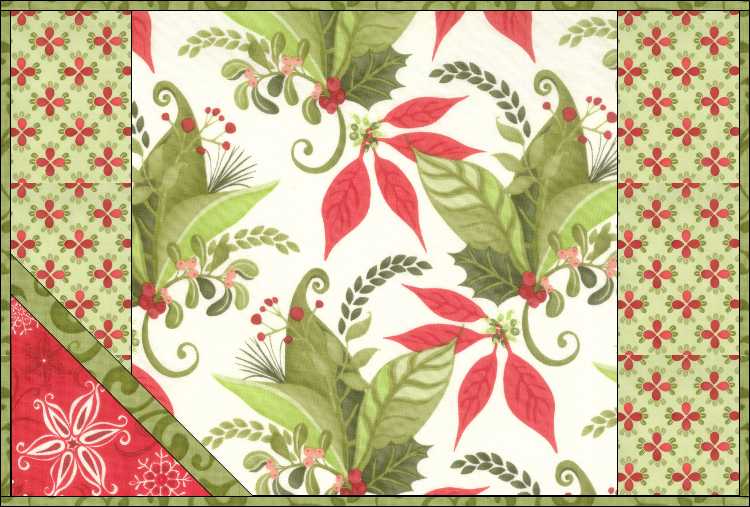


By using a holiday Fat Quarter Bundle each placemat and napkin will be unique, but they will all coordinate, and look great on your table.


You will cut up each fat quarter into the various components, then mix and match the parts.  It is quilted with cross-hatching, then the pocket is added, and the whole thing is bound.  


Fabric and Supplies:

· For a set of 4 placemats and 4 napkins, you will need 20 FQ’s (if you want different fabrics for each place setting).  From those 20 FQ’s you will have sufficient remaining fabric to make additional placemats and napkins by recombining fabrics.

· 18” x 24” piece of thin batting for each placemat

· Basting Spray or safety pins

· Matching thread 

Cutting List: ( for ONE placemat)

· From your FQ bundle Select which fabrics you will use for the center squares, the accent side panels, the pockets, pocket trim, and binding.  Select a full FQ for the back of each placemat.  Label each FQ. 

· From main print FQ cut a 14” square (center of placemat)

· From accent FQ cut two 3 1/2” x 14” rectangles (side panels)

· From contrasting FQ cut a 10” square, sub

-cut once on the diagonal (pocket)

· From  contrasting FQ cut one 15" x 1-1/4” strip , Press in half lengthwise, wrong sides together (trim strip on the edge of the pocket)

· From contrasting FQ cut  80” of 2-1/4” strips for binding.  Join strips.  Press in half lengthwise, wrong sides together.

· From two different accent fabrics, cut a 14” square  (for lined napkins)


 Instructions:

1. Stitch a 3-1/2” x 14” accent strip to either side of the center 14” square.  Press toward the accent fabric.

2. Layer the placemat with batting and a FQ for backing.  Spray baste or pin layers together. 

3. Mark cross hatching on quilt top with washable  marker.  Quilt with matching thread.  Use a walking foot on your machine to keep the layers from shifting.

4. Trim placemat to remove excess batting and backing and to even up the edges.

5. Pin pressed 15" x 1-1/4” trim strip to the long side of one of the pocket triangles, right side together and raw edges matching.  Place second pocket triangle on top of first triangle, right sides together and pin along the long edge.  The trim strip will be between the two triangles.  Stitch along the long edge through all layers being careful not to stretch the bias edge of the triangles.

6. Press the two pocket triangles away from the trim strip.  Press the whole unit with starch or sizing to give it some extra body.  Trim the two short sides of the triangle with a large square ruler to even up the edges and make sure they are square.

7. Align the pocket triangle unit with lower left corner of the placemat.  Pin in place and baste 1/8” from the raw edge.

8. Open out one end of the prepared binding strip and fold the end over to form a 45 degree angle to the long edge.  Refold the binding strip in half and press.   Stitch the binding to the BACK of the placemat leaving the first 4” unstitched using a 1/4” seam.  Use matching thread for both the top and the back.  Use a walking foot to stitch down the binding and miter the corners.

9. When you get near the starting point, pin the loose 4” of binding in place and tuck the end of the binding between the two layers of those first 4”.  Trim off any excess binding. The two ends of the binding should only overlap about 2”.  Pin all layers in place aligning raw edges of the binding to the raw edge of quilt.  Finish stitching down the binding through all layers. 

10. Press the binding away from the back.  Turn placemat over and press the binding over the raw edge of the quilt FRONT.  Steam the fold as you press.  Miter the corners and press well. 

11.  Using a blind hem stitch and matching thread, stitch down the binding on the FRONT of the quilt. 

12.  Remove any quilting marks and press the placemat.


Now make the napkin.

· Use the two 14” squares you cut from two coordinating FQs.

· With right sides together stitch the  squares together on all four sides using a quarter inch seam allowance.  Leave a 5” opening to turn in the middle of one side.  You can use a serger for this if you have one.  Just be sure to leave the opening in the 4th side.

· Turn the napkin right sides out and carefully press the edges flat, trying not to get “foldy” puckers along the edges.  If you have a Seam Roll insert it inside the napkin, position it beneath the seam and press the seam flat.  You can make a seam roll by taking four FQ’s and folding them in quarters.  Stack them one atop the other and tightly roll them up.  Wrap a strip of cut off selvage around each end of the roll and pin the strips in place with a long pin.

· Remove the seam roll and finish pressing the edges.  Make sure you push out the four corners.  Fold under the 1/4” seam allowance in the opening and press, aligning the edges of the two sides of the napkin.

· With matching thread top stitch around the napkin on all four sides 1/8” from the edge.  Stitch a second row of stitches, just next to first row of stitching if desired.  Press the  napkin, fold, and insert into the napkin pocket on the placemat.

  Click Here to download the PDF pattern.

Thanks for taking a look at this project.


Be sure to visit all the other amazing Quilters to get their Christmas in July projects.

Wednesday, May 20, 2020

Roses are the Flower of Love - New Free Block

The iris were a big hit in my garden but are starting to fade as the last blooms on the stalk come to life.  I will miss their bright yellow and purple show out my window.

Now as June approaches the roses are starting to bloom in my backyard.  It is time to dust off some rose quilt blocks to give away, and put on sale to greet the changes taking place in my yard.

Here is the new free Deco Garden Bonus Block:  Purple Roses


This was one of first five Deco Garden blocks I offered back in 2015.  After the Deco Garden block of the month quilt was complete, I did not release the first 10 bonus blocks, but planned to release them later.  I had planned to release them in a second Deco Garden Quilt.  But with the pandemic and the need to lift some spirits I decided to release some of them early.  Originally this block was released with a black background.


I love the fact that you could see the inside of the rose, and that as a purple rose, it was totally unique.  Or perhaps I just liked the purples against the black.  So I played around with the block a little bit and came up with some project ideas to inspire you.  How about a 3 block table runner?


I love the striped borders with these floral blocks.  I think it offers a nice contrast and is easy to do.  And rotating the blocks always adds interest to a table runner, making it look good from more than one direction.  Try this project with three 12" blocks and a 2" striped border.

What do you think of this block configured as a wreath?


Cut out four 12" blocks and arrange them on a 24" background square.  Then add a couple of matching borders and you have a great summertime wall quilt, or the center block for a larger applique quilt.

If you just can't live with purple and you want something a bit bigger, here is an on-point variation in pink.  I almost like the pink better than the purple.  Almost.


By putting the block on point, I create corner triangles where partial blocks fill in those corners.  Add a lacy border and this would make a great baby quilt, large wall hanging, or small throw at 41" square.

What about making nine blocks and arranging them with a cute triangle border?


Or in pink?


Or go psycho and pull funky stuff from your stash?


Ok, that is pretty ugly.  I just threw that one in to make sure you were still paying attention.

What about reducing the size of the wreath and using 3 in a table runner?


More work than you want to do to cut all those roses?  Dust of your Brother Scan N Cut and let it to the cutting for you!!!

Ok, one more, just cuz I wanted to see what I could do with this block in a larger quilt.  This one is almost Queen size.


This pink version is set on point with half and quarter blocks in the sides and corners.  The center block is left blank and quilted with the block motif in green thread.  It is 76" square with a 3" border but you could increase the borders and bring it up to a queen size without much trouble.


Here are a few more blocks and quilts on sale for half price, to offer you a few more rose and pansy inspirations.

Pansy blocks:

Deco Garden Bonus Block 1 Fancy Pansy

Deco Garden Bonus Block 43 Pansy
And a few more roses:

Roses Around Bed Runner

Deco Garden Bonus Block 48 Rosey Posey 

Deco Garden Bonus Block 10 Red Rose Trio

Deco Garden Bonus Block 44 Red Rose

Deco Garden Bonus Block 54 Blue Rose


Now THAT is a big bouquet!


Wednesday, March 18, 2020

Free Pattern to Celebrate Spring

I know, it is not officially spring yet here in Kansas, but the daffodils are starting to bloom and my iris, tulips, and other assorted green things are popping up.  The grass is greening up in the yard and the dog's favorite spots to pee are big yellow gaps in the grass.  The squirrels are nesting in the trees, making the dog bark, and the song birds are happily singing and crapping on the hub's truck.  All good signs that spring is almost here.

So I am dusting off some old favorites and seeing what I can do with them.  Oh, and they are free.

Remember this 12" dandelion block from the Deco Garden series?


Here are a few ideas for using it.


What about this cheerful table runner?  It may be a weed but the bright yellow of dandelions are a welcome bit of color in my yard after a cold, long, nasty winter.  This runner features three blocks with a twist and turn (10 degree angle) setting.


Wouldn't this look cute in a 4-block wall hanging with a few diamonds stuck in the corners and some stray dandelions in the middle ready to stick under your chin??


How about with a black background?


Or put four of them together in a wallhanging?


Or how about a dandelion wreath with a fun border?


And How about something completely different?


I can't wait to see what you do with this free block.

Tomorrow we will play in the clover.


Happy Quilting!

Sunday, June 4, 2017

Did I Mention it was Free? . . . . . . .

I love my Newsletter Subscribers.  They send me such lovely notes wishing me a speedy recovery on my recent surgery, showing their appreciation for the Free Block of the Month I offer every month, and for the bonus blocks I give to my subscribers just as a small thank you gift for hanging out with me. 


Occasionally I get a note from someone who had trouble getting the free blocks.  Over the years I have tried lots of ways to make this easier for my subscribers.  
  1. First I used BOX.net (free) until it became very glitchy.  
  2. Then I got DROPBOX.com, ($$) which worked really well for most people but some people had trouble with it.  I pay $100/year to upgrade Dropbox to the Pro version to be sure that my free pattern files get priority access when requested by my subscribers.  I want you to have an easy and pleasant experience when you go to get your free block. Still I got a lot of complaints. At the same time I had a new website developed ($$$) for Word Press to upgrade my look and improve the reliability of my shopping cart.
  3. In January, I went to a whole new website Host and Software system ($$$$) to make my website easier to navigate, make my shopping cart more problem free, and to insure I had a trouble free file download service to make sure those free blocks got to you without any problems.  I thought I had finally found a goof proof delivery system after 8 years of supplying free BOM patterns. In an attempt at full disclosure, I pay A LOT more for this new website!  In addition to several thousands dollars set up fee I now also pay a monthly fee, nearly as much as Dropbox cost me for a year! (Ok, do I have you feeling all sympathetic and oooey goooey yet?)

Despite the trouble and cost involved, I occasionally get a subscriber who either can't get the block, or, as in the case below, can't open the block.  I have sent literally hundreds of emails to subscribers to help them troubleshoot the problem and get that FREE block delivered. 


The problem is, this takes time.  And I don't have much of that left after I design the BOM blocks, write patterns for each of them, upload the FREE block patterns to my website, and write out a newsletter which delivers links to those FREE block patterns twice each month to over 3,500 subscribers!  WOW  

Oddly, I spend the rest of my time writing patterns, designing, yes, and occasionally I get to sew!  So in an attempt at reducing my problem-solving time, and increasing my revenue-producing time,  I offer the following advice if you are having trouble getting the FREE block each month.  (Did I mention it was free?)
Since two people this week mentioned they could not open the pdf files, here is what I suggested they do.  I am sharing it with all of you and hope it helps.


1.     Download and save the file to your computer first.  Then open and print the file.

2.     The files are big (2 mg) and may take longer to download than you are giving them.

3.     Use a different browser.  Not all browsers like PDF files equally.

4.     If you are on a mobile device, wait until you have access to a computer and then try to download the files again.  (see items 1, 2, and 3 above).

5.     Monthly blocks can also be downloaded from my blog and my website.  The link is in the block description on my website, and on the 2017 BOM tab on my blog.  

Unfortunately the bonus blocks can only be accessed from the newsletter. That is how I keep those blocks exclusively for subscribers.


6.  Call your spouse, son, daughter, grandson, great granddaughter, neighbor, milk man, UPS driver, or other tech savvy individual to help you.
7.  Kick something.  It never helps but I usually feel better after 1-6 don’t work.


Before you give up and call or email me,  try 1-7 again. 


If you still have a problem please be aware that . . . .it is possible. . . not in your case of course,. . . . but for others. . . . . .that it could possibly be. . . . .dare I say it. . . . .USER ERROR?????  


When you can unconditionally rule that out. . . .then consider that you could always purchase the block and the bonus block on my website.  


WHAT!???😭😣

I know, I know, you want to get it for free, you need to get it for free, you deserve to get it for free,  you count on getting it free every month, you got all the other ones for free so you should be able to get this one too!  Yes, and I also know that you are on a fixed income, receiving disability, under collections and chapter 11, just lost your dog and your best friend, your computer crashed and you lost all your free blocks, you are undergoing treatment for an unpronounceable disease and look forward to your free block as your only solace in an otherwise bleak world.
So if everything else fails and you decide to call me

or shoot me an email,  just remember,  I like chocolate. 😎


(and I might be in the tub.)


Thanks!