Monday, July 23, 2018

Creative Spaces Week 3: Organization Tips

REVISED Week Three

First things first.  The winners of Week 1 and Week 2:

Week One:  Complete 2018 BOM Pattern:  Cindy Shelley

Week Two:  Easy Binding Winder:  BJ Ramey

Congratulations Ladies!!!! 

Contact me at reeze@morningglorydesigns.com to claim your prize.


This week I am sharing a few of my favorite organization tips.  Here are a few of my favorite.

IMG_0846[1]

This is a Pampered Chef kitchen tool spinner.  I bought two of these and put one in my studio and the other out in our RV.  Nope, don’t need one in the kitchen.  I have a great drawer for that.

I love this because it keeps all the tools I need and use most right at hand next to my sewing machine.  I labeled each spot so I can return items to the correct cubby and keep it organized.

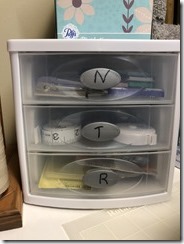
Another favorite organizer is a small drawer unit that sits on my sewing table.

IMG_0883            IMG_0882

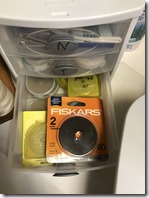
I labeled the drawer pulls N T R, which stands for Needles for my sewing machine, Tape measures, and Rotary cutter blades. I love having these nearby but away from little fingers who like to explore my studio.

IMG_0884  IMG_0885  IMG_0886

On top of this little cabinet I keep a small notebook.

IMG_0899       IMG_0898

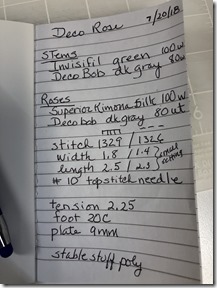
In the notebook I keep track of my machine settings for the project I am working on.  This page shows a Deco Rose block I am machine appliqueing.
  IMG_0904

The notations show my thread, machine stitch settings, tension, foot, throat plate, and the stabilizer I am using.  I also add the date I worked on the project.  This way I can pick up a project later and have all the information I need to pick up where I left off.  Gotta tell ya, this has saved me more than once.

I am used to working in a small space so I have arranged my sewing space so the things I need and use all the time are handy.  In the 5-drawer unit next to my machine table I have organized more tools I use a lot.
IMG_0848[1]

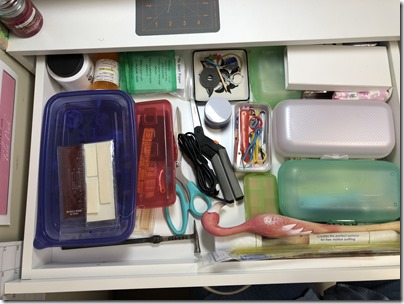
The top drawers holds extra scissors, snips, paper piecing tools, extra thread, and other “stuff.” 

Notice that I keep a lot of stuff in closed cases.  This is so I can grab what I need and throw it in my travel case when I am getting ready to go on the road.  When I get home it goes back in the drawer it came out of and I am ready to get to work at home again.
IMG_0850[1]

Drawer #2 keeps all my sewing machine accessories and users manuals nearby.  These drawers are large but shallow, so they hold everything where it is easy to see.  I have 3 Berninas so I label each box and case with the machine it goes to.  It is also a good place to tuck my machine quilting gloves so they are handy when I get out my quilting foot or stitch regulator.

IMG_0851[1]

I’ll save the bottom 3 drawers when we get to thread.  hint hint

My best organizer in my studio is my 14’ work top with cupboards underneath.

IMG_0858[1]

The drawers are labeled so I know what is in each one.  I have a drawer for rulers, for embroidery machine hoops and stabilizers, specialty thread, fusible web and stuff on a roll.

IMG_0861

Specialty rulers and templates live here.  These are things I don’t use often but are too large to fit in my template tub.

IMG_0862

This drawer holds my hoops, basting spray, stabilizers and other things I need when doing machine embroidery.   Unfortunately my embroidery unit is too big to fit in this drawer so it sits up on the counter.

IMG_0864

I use a LOT of fusible web.  I keep my large rolls and small pieces in this drawer.  I love having different kinds of web so I can select just the right type and size for the project I am working on.  Scraps and leftovers go back in the drawer when I am done working.

IMG_0865

This last drawer holds stuff on a roll.  Freezer paper, parchment paper, pressing mats, quilting paper, and clear acetate sheets all live happily together in here.

Yes, there are more drawers, but I will save those for next week.

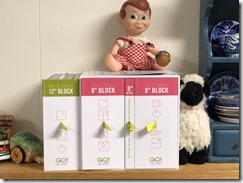
Finally, I have these great cubbies beneath my cutting table.  The are just perfect for storing my GO! Cutter dies and mats.  I keep an inventory of what I have so it is easy to go right to the size I need when I am planning a project.

 Big dies are stored in those blue bins.  One for narrow dies, and one for the big square dies.  My large cubes are there too, although I keep the small dies for my 8" and 12” cubes on the shelf above my counter top with Big Boy keeping watch on his hamburger, and the sheep!

IMG_0866    IMG_0874

So that is all for today.  Join me next week to see how I deal with fabric, thread, embellishments and all the other “stuff” that fills up my studio

OH, I almost forgot. 

This week’s give away is a pair of Karen K Buckley 4" Perfect Scissors


Leave a comment to be entered to win. 

Share your favorite organizational tip.  Or give me a few suggestions for how I can be better organized.  My studio is clearly a work in progress. LOL

By the way. . . .

IMG_0784     IMG_0786

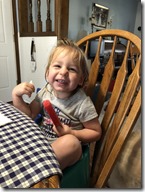
Here are the owners of those little fingers who love to play in g-ma’s studio.  Of course they are eating popsicles and ice cream cones.  This IS gramma’s house, after all!!

Red heartRed heartRed heartRed heartRed heartRed heartRed heartRed heartRed heartRed heartRed heartRed heartRed heartRed heartRed heartRed heartRed heartRed heartRed heartRed heartRed heartRed heartRed heartRed heartRed heart

Be sure to visit all the other Hoppers in this second week of the Creative Spaces Blog Hop.

Here’s the list of participants and the days of the week they’ll be posting. Click the links to go to each of their blogs below and follow them, or bookmark their sites so you can check out what each has to say every week!
MONDAYS
TUESDAYS
WEDNESDAYS
THURSDAYS
FRIDAYS
SATURDAYS
SUNDAYS


Monday, July 16, 2018

My Favorite Tools: Creative Spaces Blog Hop Week 2

Welcome Back!

This week we are looking at favorite tools.  I can't wait to see what all 16 of us choose.  Do you think we will all pick the same thing?  I suppose we will all say our rotary cutter is our favorite tool. But in spite of how much I love my cutter, I have a few other tools that I use all the time and are my go-to tool for certain tasks.

I sort tools into categories and I'll tell you my favorite tool in each category.

Sewing
Pressing
Cutting
Measuring

Sewing:  I sew on a Bernina 790, Bernina 440, and Bernina 240 I use for travel.  Um I really like Berninas.  My sit down long arm is a Martelli Bella.  I also have a Singer Featherweight 221.  I had more machines at one time but in the "Great Purge of 15" (the year I retired from college teaching) I got rid of a number of machines I had been collecting and using.

My favorite of them all, I gotta say it is the Bernina 440.  This machine is a workhorse, totally reliable, uses any thread I put on it, and can do anything!  Wow, I love this machine.

You would think my new 790 would be my dream machine because of all the bells and whistles, and I confess, I was seduced by the bobbin and the embroidery unit. It is a little temperamental at times, however, and when I sit down to sew I want to SEW, not smooth over the ego of an uppity machine with sensitive feelings!  It is getting better as we get to know each other more.  But in a moment of pique I always turn to my 440.  It is my retreat machine because it can be easily transported in my car in its Tutto Trolly.

I digress, however.  Because my favorite sewing tool is a simple pair of bent nose tweezers.


These beauties are my third hand.  They hold onto the ends of fabric as it goes through the machine and are indispensable for sewing curves.  I teach a class on sewing curves without pins and issue everyone a pair of these at the start of the class. I used to love my stiletto but these tweezers have taken over that #1 spot in my heart.  If you want a pair you can get them HERE.

Pressing:  Without a doubt my single favorite pressing tool is my Easy Binding Winder!


I used to HATE doing binding.  Hate, hate,  hate.   There are not many things I am that strongly negative about, except maybe the neighbor's dog that craps in my yard.  This gadget changed all that, (except the dog) and I am so proud to say it was invented and marketed by my good friend Peggy and her husband Rex.  It clamps to my ironing board and winds up my binding while I press it.

The best part - to me at least - is that is feeds off the winder while I sew on the binding.  No more tangling around my chair or feet getting coated with cat hair while I sew.  Nice.

Watch how it works.  


I like this tool so much that I bought one to give away to this week's lucky winner.  

Leave a comment on this blog post to be entered to win an Easy Binding Winder.  
(sorry, USA residents only)


Cutting:  It is a real toss up between my Martelli Rotary Cutting Mat or my Go! Big cutter.

This mat is a dream.  Not only does it sit on a smooth turntable, but the markings make it super easy to trim blocks and units as I sew and press.  When cutting out diamonds from jelly roll strips using my Stripper template (Marti Michell) - something I do a lot - this is my best friend.  It is a big surface and can hold the strip while I cut and spin the mat.  


Side benefit:  Buster loves to ride on it when I give it a spin!  hahahaha


What can I say?  My GO! Big in my new BFF.  I do lots of curved blocks like apple cores, drunkards path, and my all time favorite Winding Ways.  I cut all the pieces for this quilt in one evening.


Measuring.  This may surprise you.  I have tons of rulers, and like many of you, can't resist a new ruler, gizmo, or gadget.  But as a designer, I really need a measuring tool that can calculate all kinds of math needed to write a pattern.  My favorite tool is the Quilter's Fabric Calc - Quilt Design and Estimating Calculator. 
I bought one when they first came out and my son bought me one for Christmas one year.  I was thrilled to have 2.  One stays in my office next to my computer - where I do all my design work. 

The other stays downstairs in my studio where I often need it to calculate how much fabric I need to cut a certain number of strips.  I used to teach a class in how to use it, but I am thinking maybe I will do an online tutorial.  If you design, you need this!


Here is what you can do with it.


  • Solves diagonals, converts metric to decimal, decimal to fractions and way more
  • Find total yardage, including backing, binding, borders and drop for any quilting project
  • Calculate the total yardage for squares, ½ square triangles, ¼ square triangles, 45° and 60° diamond
  • Reverse the calculations: find the number of squares and diamonds that can be cut from fabric
  • Store fabric yardage solutions for six individual types of fabric and view total yardage for material

Yup, its my total, all time, favorite measuring tool.  

However, there is also a great app I use on my iPad and iPhone which is also a great tool for calculating yardage, especially backing and binding.  It is called the Quilter's Little Helper and is created by Robert Kaufman Fabrics.


It also calculates bias binding, something the Quilt Calc doesn't do.  The other calculation it does that I really like is shows me how much backing I need if I position it vertically or horizontally.  I love a gadget that I can actually use, and makes my life easier.


It does even more calculations than the Quilter's Fabric Calc, using the calculators created by Quilters Paradise.  

You can use these online if you don't have an iPhone or iPad. Bookmark this link to see them for yourself.

So thanks for wandering through my studio with me looking at some tools and some quilts made using those tools.  Hope you had fun.

Want to win a FREE Easy Binding Winder???  Leave a comment.  Winner will be announced next Tuesday.


Be sure to visit all the other Hoppers in this second week of the Creative Spaces Blog Hop.

Here’s the list of participants and the days of the week they’ll be posting. Click the links to go to each of their blogs below and follow them, or bookmark their sites so you can check out what each has to say every week!

MONDAYS

TUESDAYS

WEDNESDAYS

THURSDAYS

FRIDAYS

SATURDAYS

SUNDAYS


Monday, July 9, 2018

Welcome to Week 1 of our Creative Space Blog Hop

We have 16 creatives sharing their spaces, tips, and perhaps a few giveaways!
July 9 through August 19!
Week 1: Studio Clean Up – before and after pics
Week 2: Favorite Tools
Week 3: Organizing Tips
Week 4: Dealing with Scraps and/or Fabric
Week 5: Dealing with Embellishments/Buttons/Thread
Week 6: Dealing with Tools/Rulers
There are awesome giveaways on all the blogs, so check them all out.  

Week one:  Studio Before and After

Be sure to leave a comment on this blog post to be entered to win a free pattern pack for my 2018 Block of the month!


OK, I am not proud of this but this is the "BEFORE" picture so you will see what I had to work with.  Yup, complete mess.  This photo is taken from the stairs descending down to my studio.

My studio is in a big "L" shape with sewing machine area by the stairs, storage in the middle, and more work surfaces and storage down the big "L" part of the studio.

My sewing machine table has been worse, so this is actually pretty good. . . for me!


My cutting table really is bad, so bad in fact, I can't get to it because of all the suitcases and sewing machine bags all around it.


My sit down long arm is buried.  Only its light strains to get out from under the stuff!

This is my pattern and class storage area above, and vending storage area below.  I had already started on this area a few days ago, so it is not as bad as some of the others.  I just got back from vending 2 weeks ago and had to get stuff put away.

 Yes, that is a potty seat you see in the blue basket.  My studio became the dumping area during our recent home renovation.  Some things just have not yet made it back upstairs.  Ok, the kid is potty trained already and no longer needs this, but still. . . it doesn't need to be in my studio.

These are the quilt storage racks I use to store all of my quilts, as well as the quilts I use in my programs and trunk shows.  And yes, the lion push toy, like the potty seat, is one of those, "now what do I do with this?" sort of things.

My son and hubs built this for me.  It really helps to store a lot of stuff that was formerly homeless.  I use this space for my Go! Big cutter and fabric selection from the storage racks across from it.  But this work space does not always see the light of day!

This is the other side of my quilt storage racks.  It holds UFO's, fabric, projects waiting in the que, and my design walls. 

After several hours of work. . . .


OK, now that I have spent a few more hours in the studio there is hope.  Here are the parts that are looking better.

Sewing machine -- Bernina 790 -- cleaned off and ready to sew.  

You know my grandson has been in my studio because there are matchbox race cars sitting on my stuff.  He sneaks down here and plays while he is supposed to be taking a nap.  And of course, Nana does not know this because Nana is napping!!

#43 where I found it after the kids were here over the weekend.  Bryce thinks there should be a racecar on every surface.

Storage area boxes organized and most of the stuff cleaned up and put away.  Ok, a few more things to get put away, but this is progress!  And all the suitcases and sewing machine bags are all neatly stored, so you can actually see the floor and get to my cutting table.

Yes, my cutting table is now cleaned off and ready to get to work.   And yes, there is a matchbox car on the cutting mat.  The rotary cutter was safely put away before the kids came over, thankfully.

The south window work space is nearly cleaned up, except for Buster, who is my constant companion in the studio.  This is one of his favorite spots to sit.  Stay tuned for more about my absolute favorite Martelli turntable during favorite tools week.

Of course he wanted to be close to #43.  Why, so he can knock it off, of course!

Here is my work space without Buster and you can see my convenient ruler storage racks hold all my square rulers.

And a little bit of blue willow china is part of my collection of children's dishes inherited from my mom.  Did you spot Big Boy sitting on my GO! cubes?  He is a reminder of my 16th birthday, when an old beau took me to Big Boy's for dinner.  Big Boy's was a big deal back then!  As you can see,  he's been with me for a while.

Big Boy, that is, NOT the old beau.


Big board is cleaned off and ready for use.  The cover is an old piece of upholstery fabric which used to be drapes on the windows in our old farm house back in Avon, OH.  Been saving a pair of these for years and finally decided it was a perfect ironing board cover.  
Normally I put striped ticking on my ironing board so I have reference lines for pressing.  But I was out, so the old curtain was re-purposed.


Machine area looking good.  Do you notice that Slimline Lamp over my machine?  We are giving one of those away with this blog hop.  Trust me, you want one!!  It is the best sewing light I ever used.

Slimline LED lamp some lucky blog hopper will win!

Thread storage is finally neat and tidy.  Next time I will show you what I keep in those cool drawers next to my machine.

Buster gives it all his stamp of approval.

Hope you had fun seeing my before and after studio pics.  OK, there is a lot more to clean up, but I will be sharing lots of fun stuff with you over the 6 weeks of this blog hop.

Leave a comment and be entered to win a complete set of patterns for my 2018 Block of the Month!

Thanks for stopping by.  Be sure to visit the other 16 designers who are hanging out with us on this blog hop.  There are some great prizes to be won.


Don’t forget to visit all the participants in our hop to take a 

peek into their studios!

Mondays

Wednesdays

Thursdays

Fridays

Saturdays

Sundays