Ziggy Diamonds
Monday, October 31 from 9am to 5 pm

This is a brand new workshop and a brand new quilt. It may look similar to designs I have done in the past is is different in several significant ways.
1. It is made with precuts: jelly rolls (2 or more) or fat quarters.
2. It is made in component parts (4-patch blocks) that can be mixed and matched or moved anywhere in the quilt.
3. It is assembled in super easy diagonal rows.
4. It can be adapted to any size from placemat to bed quilt!
Yup, this is a really fun and simple project once you get the "4-patch" system.
Here is what I mean:
Questions: contact me at reeze@morningglorydesign.com
Choose colors: BRIGHT COLORS work best for this project. Solids, blenders, batiks, even busy prints will work as long as they are bright! My sample used a blender with directional stripes!
Pick a light and a dark in each color you want to use. You could choose the same color in different values, or different colors, prints, or blenders which go together, OR contrast! In the pattern and class I am choosing a light and dark value of the same color family.
Choose fabric:
- 6 Diamond Layout: If you are making a placemat or wall quilt you will need 2 jelly rolls unless the 2-1/2" roll of strips comes with 2 of each color.
- You will only need 1 strip of each light, but you will need 2 strips of each dark.
- If you repeat a color you need additional strips (2 darks and 1 light).
- Left over dark and light 2-1/2" diamonds are used to make the partial diamonds on the top and bottom edges of the quilt. This means colors will be repeated in those locations.
- A jelly roll typically contains 40 strips, but not all collections have 40 different fabrics, so there is certain to be some repeats in most jelly rolls, but they may not be the colors you want/need. Because of this, a second jelly roll is a must.
- 12 Diamond Layout: If you want anything larger than a 6-Diamond quilt, you will need Fat Quarters.
- 15 Diamonds or more: If you want anything larger than a 12 diamond quilt, you will need some 1/2 yard cuts of your darks and 1/4 yard cuts of your lights.
- Black and White: In addition, you will need a 1/4 yard of white and anywhere from 1-2 yards of black, depending on the size you choose.

Diamond 4-patch components

Make the diamond components:
- White and black 4-patch diamonds are made to go in the center of each large diamond.
- Black 4-patch diamonds are made to go between each large diamond. Actually, we will cut 4-1/2" diamonds, cuz that is easier than sewing 4 together.
- Create 4-patch light and dark color diamonds for the four sides of the diamond.
- Create 2-patch dark diamonds for the "arms" which link the diamonds together.
- Create some extra 2-patch darks and 1-patch lights to fill in the top and bottom of the quilt.
When all the diamond parts are complete, the quilt is ready to be assembled. This works best with a design wall or a flannel back table cloth on the floor or a table.

Assemble the Quilt:
This is the fun part. Arrange the diamonds in vertical and horizontal rows.
Move them around until you like the mix of colors. No map or row by row instructions needed!
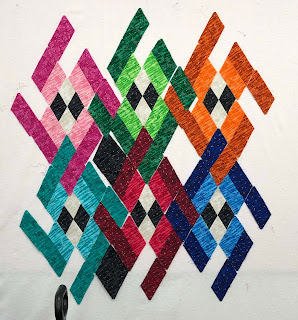
Use as many diamonds or as few diamonds as you want. The more you make, the bigger the quilt. A wall quilt with 6 diamonds would finish like the this:
 |
| 40 x 46 wall or crib quilt Or like this: |
 |
| 27 x 66 table runner |
The more triangle rows you make, and the wider those rows get, increases the size of the quilt by roughly 12" of width and 20" of length. Use this shortcut to determine what size quilt you want to make and the number of rows you need to make.
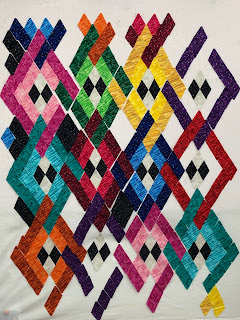
A layout with four diamonds across and three rows down is shown below.

The finished quilt would look like this:
 |
| 50 x 62 Lap or Throw Quilt |
Keep adding to the quilt and it keeps growing!!!
 |
| 57 X 66 |
The quilt top and bottom get trimmed and a simple border added.
The quilt sides get an additional dark diamond to give those outer diamonds an "elbow" and an accent diamond is surrounded by black diamonds to finish off the design.
WORKSHOP: a supply list for the class is on my website. Here is the LINK.
Due to time limits, we will make a 6-Diamond Quilt in the class.
You can always add to it if you want to finish it as a larger quilt.

Wow LOVE it! Wish I were able to come to Houston this year!
ReplyDelete