
I love the beginning of each new month – it means I get to post another new block for the Midnight Posies BOM! This month’s block is called the Star Flower Block. It is based on a simple friendship star 
You can download the PDF instructions here.
You now have the patterns for the first two complete rows of the quilt. If you want to start assembling the blocks. . . . I know, I get excited and can’t wait to see how they look together . . . here are the directions for the sashing! You will want to save these instructions for later if you wish to continue assembling the quilt as you go. I will post complete sashing and border instructions along with the last block so you won’t miss out once all the blocks are made. Hope you enjoy this next installment of our BOM.
Cutting List for Sashing
Cut (5) 2” strips of black (WOF) for sashing
Cut (5) 5 ½” strips of black (WOF) for borders
• From the sashing strips, cut eight (8) pieces that are 9 ½” long. You will use these to join
the blocks together into rows.
• Make four rows of blocks with three blocks
in each row. Arrange the blocks as shown in
the illustration or create your own arrangement.
• From the remaining sashing strips cut three
(3) strips that are 30 ½” long. You will use
these to join the rows together.
• Press all sashing away from the blocks.


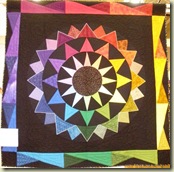 Color Wheel Quilt – I designed and made this quilt as a teaching tool for my color class


 I am in a Mini Spring Blooms Quilt Swap sponsored by
  Now that is is done. . . .I want to keep it instead of sending it off to an unknown person in Michigan!!! Of course I will be getting one in the mail in return, but it just isn't the same as making it myself and loving it! LOL When I get my mini from my mystery partner, I will post a picture. Off in the mail this one goes today!
 The second set of blocks are jelly fish. This was from a coloring page I found on the web. It was just so cute. I often find coloring pages great sources for applique or embroidery. I love to do the machine button hole stitch on the edges and use different color threads to realy enhance the pictures and add details.
 I found this background fabric in several colors on my recent camping vacation and thought the jellyfish would love swimming around in this swirly water. You can't really see in the picture, but I stitched the pieces down with variagated gold metalic thread! I wasn not sure if it would work but I increased the tension on the bottom thread and decreased the tension on the top (metalic) thread. Then I used a Metalic needle (it has a bigger hole so the thread doesn't shred) and so far, not a single broken thread. It works great!
 Then i realized that the flamingo was too big to stand in the water -- I didn't want him standing on the beach sand -- so I added a puddle for him to stand in and added some ripples around his legs with blue thread. I think I will add some more so it looks more realistic. I pieced and appliqued the background (sky, water, sand) then machine appliqued all the elements on top. The flamingo legs are satin stitch in orange thread with a little extra wide thread play at the knobby knees.
  Of course it meant I had to clean up my studio and get rid of all the junk! That alone made it worth it. I finally parted with stuff I have been hauling around for decades which I really do not need or want. I bet you have a pile or two of that stuff in your house too! :-)
 I had to move my book shelves and get rid of my rocking chair and book nook corner in my studio to fit in the frame, but the rug works great to cushion my feet when I am standing at the frame. My studio is long and narrow 24' x 9' so there wasn't room to put it on one of the end walls. This way I can get behind it to use the laser and pantos with the rear handles. I really wish I could get wheels for it so I can move it around as I need to, but my floor is cement (under the vinyl) and not particularly flat!
 This wonderful nine-patch variation is super easy. Bright purple petals and a bold yellow center make it striking. The simple leaves are formed by half square triangles using a medium green and the black background fabric. Of course you can make yours any color you choose, but the brighter the better. Bright clear colors really get a big punch from the black background, and Mother Nature is skimpy on colors in her flower garden. She goes for pure clear colors with lots of zing to attract those busy summer polinators!
 This version captures the blue and purple petals of real pansies and the four-patch yellows in the center add more interest. Smaller bites off the corners really adds to the shape of the pansey petals as does extending the petals into the center. Instructions for these and other variations will be included in the purchased pattern. I hope you have fun creating your own variations.
 The delicate blooms of the tiny Lily of the Valley have always fascinated me. I love their unique scent, the quintessential floral fragrance, Muget du bois! It was my mother's favorite perfume. We bought her a bottle for Christmas every year. And when she would walk downstairs, stressed up for an occasion, the linger scent of these delicate lillies would follow her. I will forever associate their gentle little bells and fragrance with my mother.


